Google & Outlook Calendar Integration
Last updated: August 27, 2026
READING TIME ~3 minutes | AREA: Schedule & Dispatch |
Overview
Keep your team's schedule connected by integrating Coperniq with Google Calendar or Microsoft Outlook Calendar. Once enabled, appointments and work order visits automatically sync with each user's connected calendar, while personal availability can be displayed in Coperniq to help prevent scheduling conflicts.
Before You Begin
Setting up the calendar integration is a two-step process:
An admin enables the calendar provider for the company.
Each user connects their own Google or Outlook calendar.
Note: Enabling the integration does not automatically connect users' calendars. Every user who wants calendar syncing must connect their own account.
Step 1: Enable the Calendar Integration
This step only needs to be completed once by an admin.
To enable the integration:
Go to Company Settings.
Select Integrations.
Scroll to the Calendar section.
Choose your company's calendar provider:
Google Calendar
Microsoft Outlook Calendar
Click Connect.
Once enabled, the selected provider becomes available to all users in your company.
Note: Users can only connect to the calendar provider that has been enabled by your company.
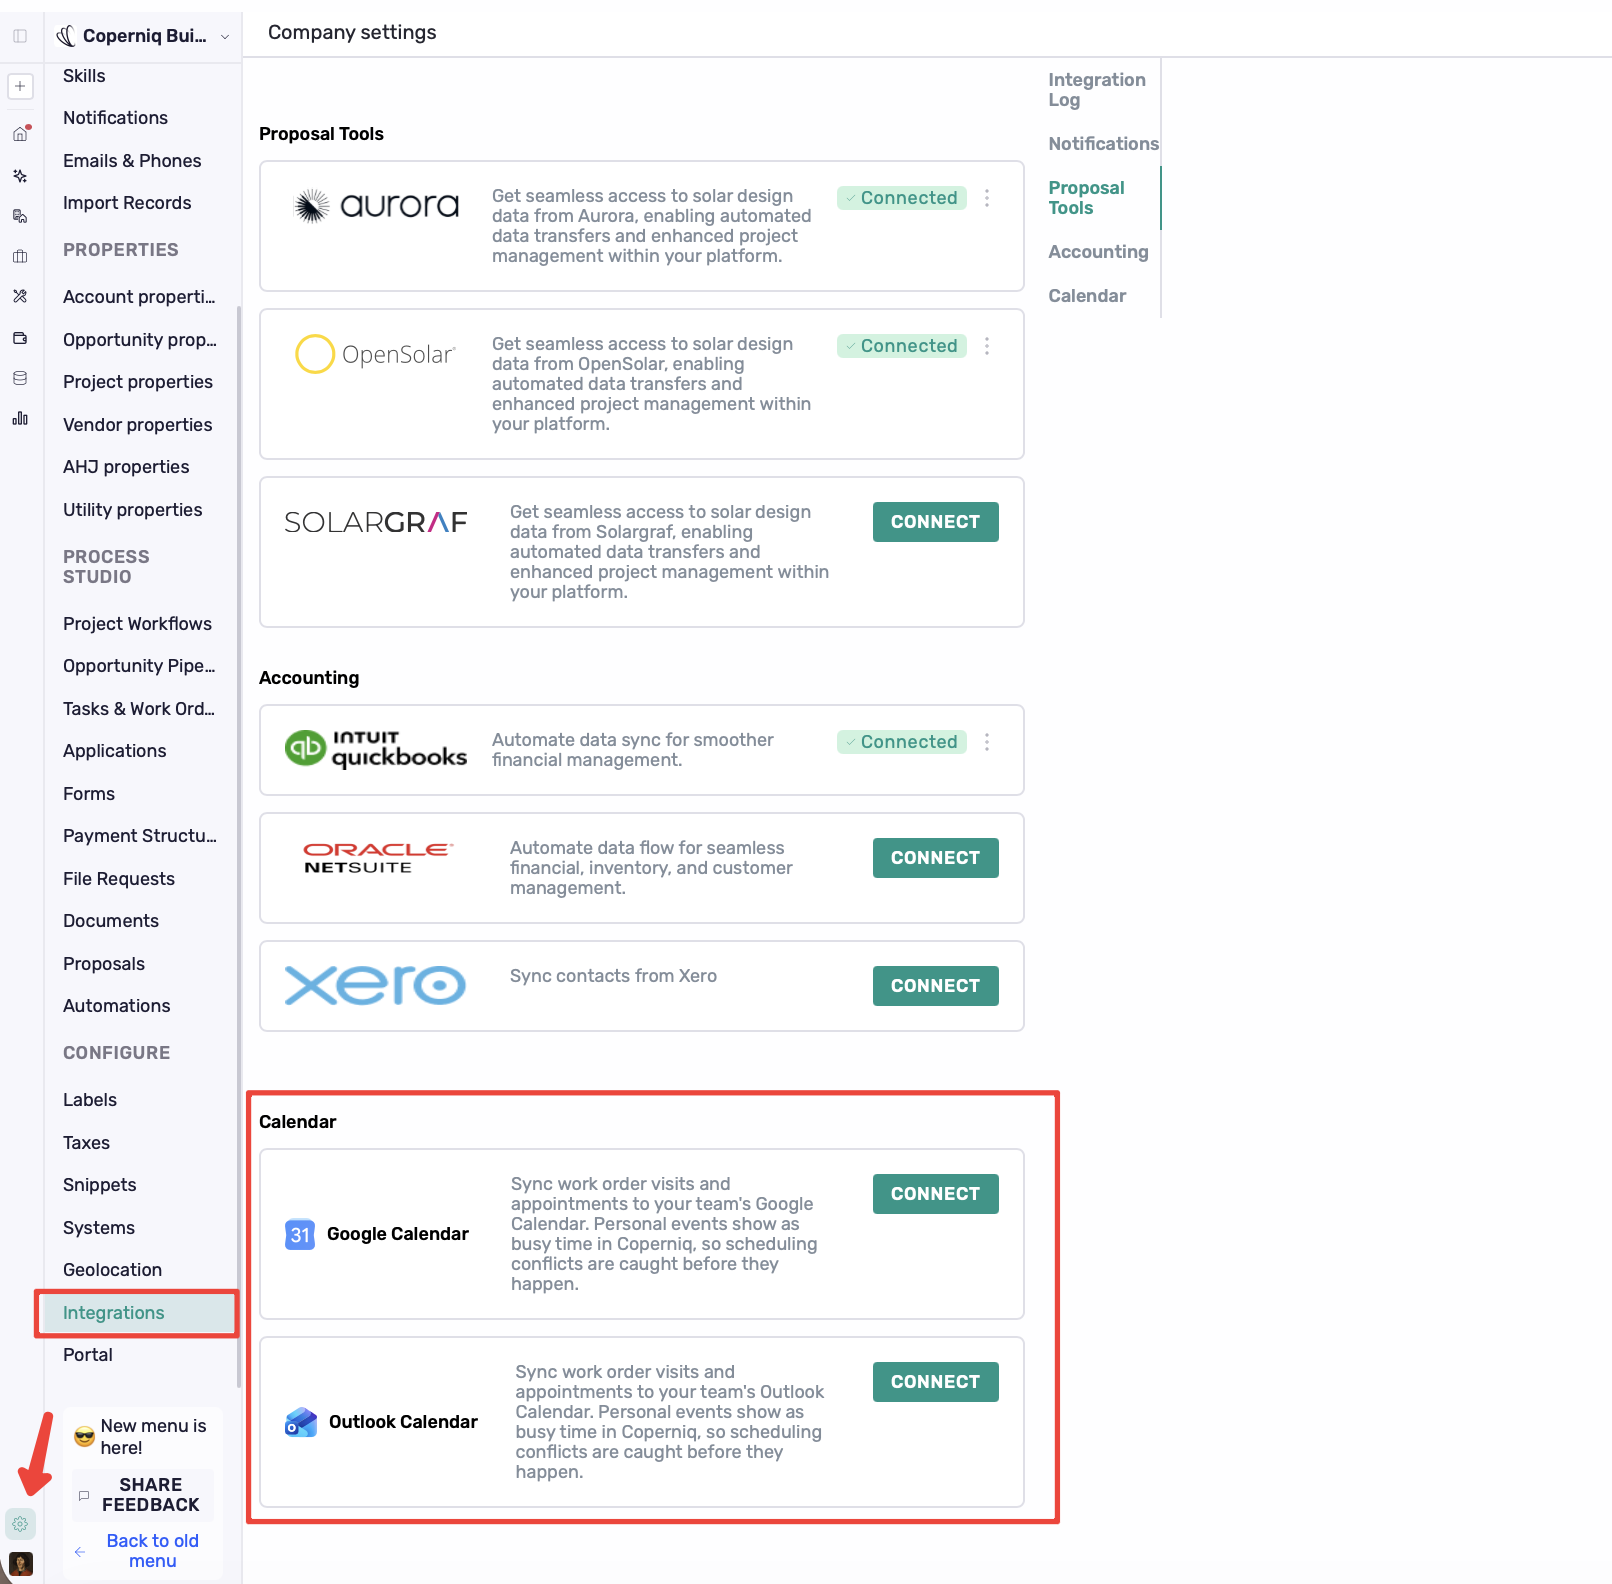
Calendar Integrations page showing Google Calendar and Microsoft Outlook Calendar
Manage Calendar Settings
After enabling the integration, click View to manage availability settings and connected calendars.
Choose what appears in Coperniq
Admins can control whether the following personal calendar events are displayed in Coperniq:
Busy events
Out of Office events
Displaying these events helps schedulers see when team members are unavailable and avoid potential scheduling conflicts.
Review calendar activity
Use the tabs to quickly review:
Busy: Synced Busy events
Out of Office: Synced Out of Office events
Connected Members: Connected users and their sync status
Admins can also disconnect a user’s calendar from the Connected Members tab when necessary.
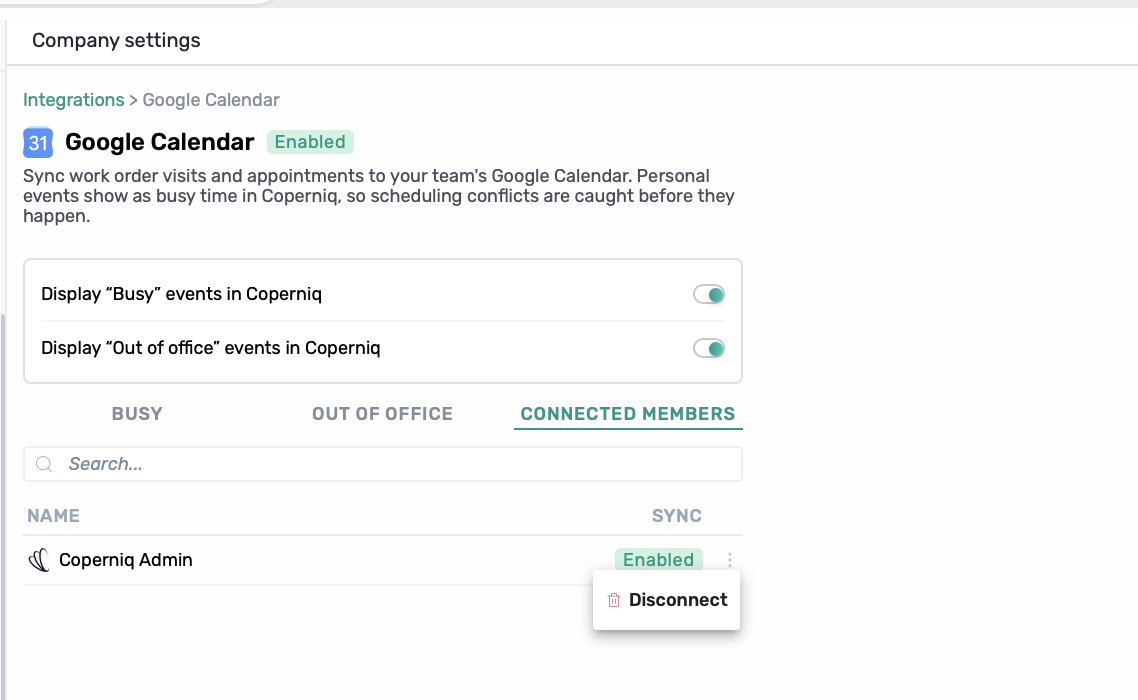
Calendar settings page with the Busy, Out of Office, and Connected Members tabs
Step 2: Connect Your Calendar
After the company integration has been enabled, each user can connect their own calendar.
To connect your calendar:
Click your Profile icon in the bottom-left corner.
Open Profile Settings.
Under Calendar, click + Calendar.
Sign in with your Google or Microsoft account.
Review the requested permissions.
Click Allow.
Once connected, Coperniq will begin syncing supported events automatically.
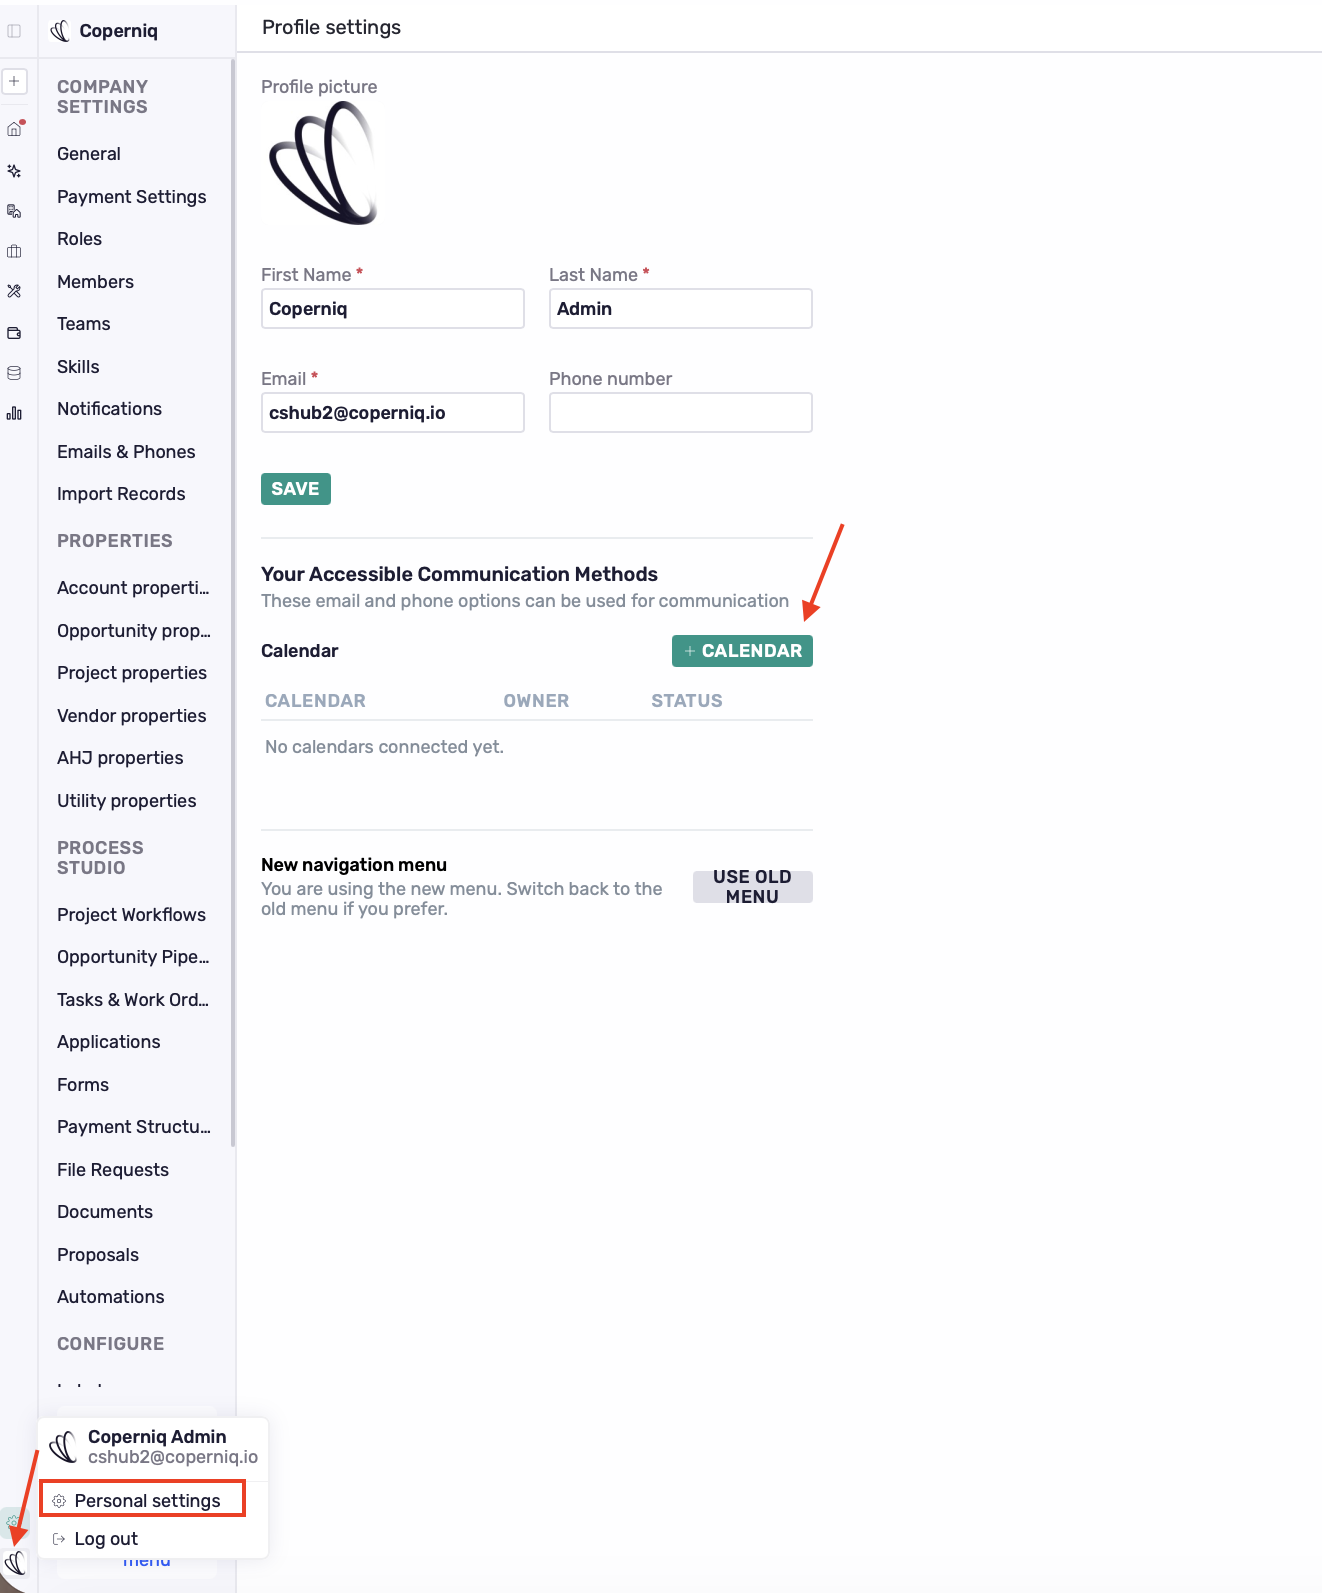
User Profile Settings showing the Calendar section
How Calendar Sync Works
Calendar syncing is one-way, with Coperniq as the source of truth.
This means:
Create, update, or reschedule appointments and work order visits in Coperniq.
Those changes are automatically reflected in your connected Google or Outlook calendar.
Changes made directly in your external calendar do not update the original record in Coperniq.
To ensure your schedule stays accurate, always manage appointments and work order visits from Coperniq.
What Gets Synced
From Coperniq to Your Calendar
The following events are synced to your connected calendar:
Appointments
Field Work Orders
Service Work Orders
The following records are not synced:
Office Work Orders
Reminders
Other non-field events
From Your Calendar to Coperniq
If enabled by your admin, personal calendar events marked as:
Busy
Out of Office
are displayed in Coperniq so schedulers can easily identify when users are unavailable.
This helps reduce scheduling conflicts during scheduling and dispatching.
Scheduling Conflicts
When assigning or scheduling work, Coperniq checks for conflicts with:
Existing Coperniq appointments.
Connected calendar events marked as Busy.
If a conflict is found, Coperniq displays a warning to let you know the user is already scheduled during that time.
Note: The warning does not prevent scheduling. If needed, you can still continue and intentionally double-book the event.
If You Edit an Event in Google or Outlook
If you change the date or time of a Coperniq event directly in Google Calendar or Outlook:
The event becomes disconnected from the original Coperniq record.
The original appointment or work order remains unchanged in Coperniq.
The edited calendar event is shown only as Busy time inside Coperniq.
To keep appointments synchronized, always make scheduling changes from Coperniq rather than from your external calendar.
Frequently Asked Questions
Why don't I see the + Calendar button?
Make sure:
Your company has enabled the calendar integration.
You're opening your own Profile Settings.
You've refreshed the page or signed back in after the integration was enabled.
If the option still isn't available, contact Coperniq Support at support@coperniq.io.
Does enabling the integration connect everyone's calendar?
No. Enabling the integration only makes the calendar provider available. Each user must connect their own calendar.
Can I connect someone else's calendar?
No. Calendar connections are personal. Each user must authorize and manage their own calendar.
Which Coperniq records sync to my calendar?
Appointments, Field Work Orders, and Service Work Orders sync to your connected Google or Outlook calendar.
What happens if I edit an event directly in Google Calendar or Outlook?
Changing the date or time of a synced event in your external calendar disconnects it from the original Coperniq record. The event will continue to appear only as a Busy block in Coperniq.
Can Coperniq prevent double-booking?
No. Coperniq warns you when a scheduling conflict is detected, but it still allows you to proceed if you intentionally want to double-book the user.
What do the Busy and Out of Office settings do?
These settings allow Coperniq to display users' personal Busy and Out of Office events, giving schedulers a complete view of team availability.
Best Practices
Enable the calendar integration before asking users to connect their calendars.
Have each team member connect their own calendar during onboarding.
Schedule and reschedule appointments from Coperniq, not from Google or Outlook.
Enable Busy and Out of Office events to improve scheduling visibility.
Review the Connected Members tab periodically to verify users are connected successfully.