Service Plans
Last updated: October 6, 2026
Service Plans allow you to create recurring maintenance and service packages for your clients. With Service Plans, you can automate the creation of work orders and invoices on a schedule, ensuring consistent service delivery and predictable revenue.
What Are Service Plans?
Service Plans are templates that define:
Recurring work orders - Tasks that need to be performed on a schedule (e.g., monthly inspections, quarterly maintenance)
Pricing and invoicing - How much to charge and how often to invoice
Duration - How long the service plan lasts (6, 12, 24 months, or custom)
Auto-renewal - Whether the plan automatically renews when it expires
When you assign a Service Plan to a account, it creates a Service Plan Instance that automatically generates work orders and invoices according to the plan's schedule.
Key Concepts
Service Plan Template
A reusable template that defines the structure of a service plan. Templates are created once and can be assigned to multiple accounts.
Service Plan Instance
An active service plan assigned to a specific account and site(s). Each instance has its own start date, end date, and status (Active, Completed, or Cancelled).
Service Plan Items
Individual work order templates that are part of a service plan. Each item defines:
What work needs to be done (the work order template)
How often it should be performed (frequency: one-time, monthly, quarterly, bi-annual, or annual)
When it should be scheduled (specific dates, days of week, etc.)
Creating a Service Plan Template
Step 1: Navigate to Service Plans
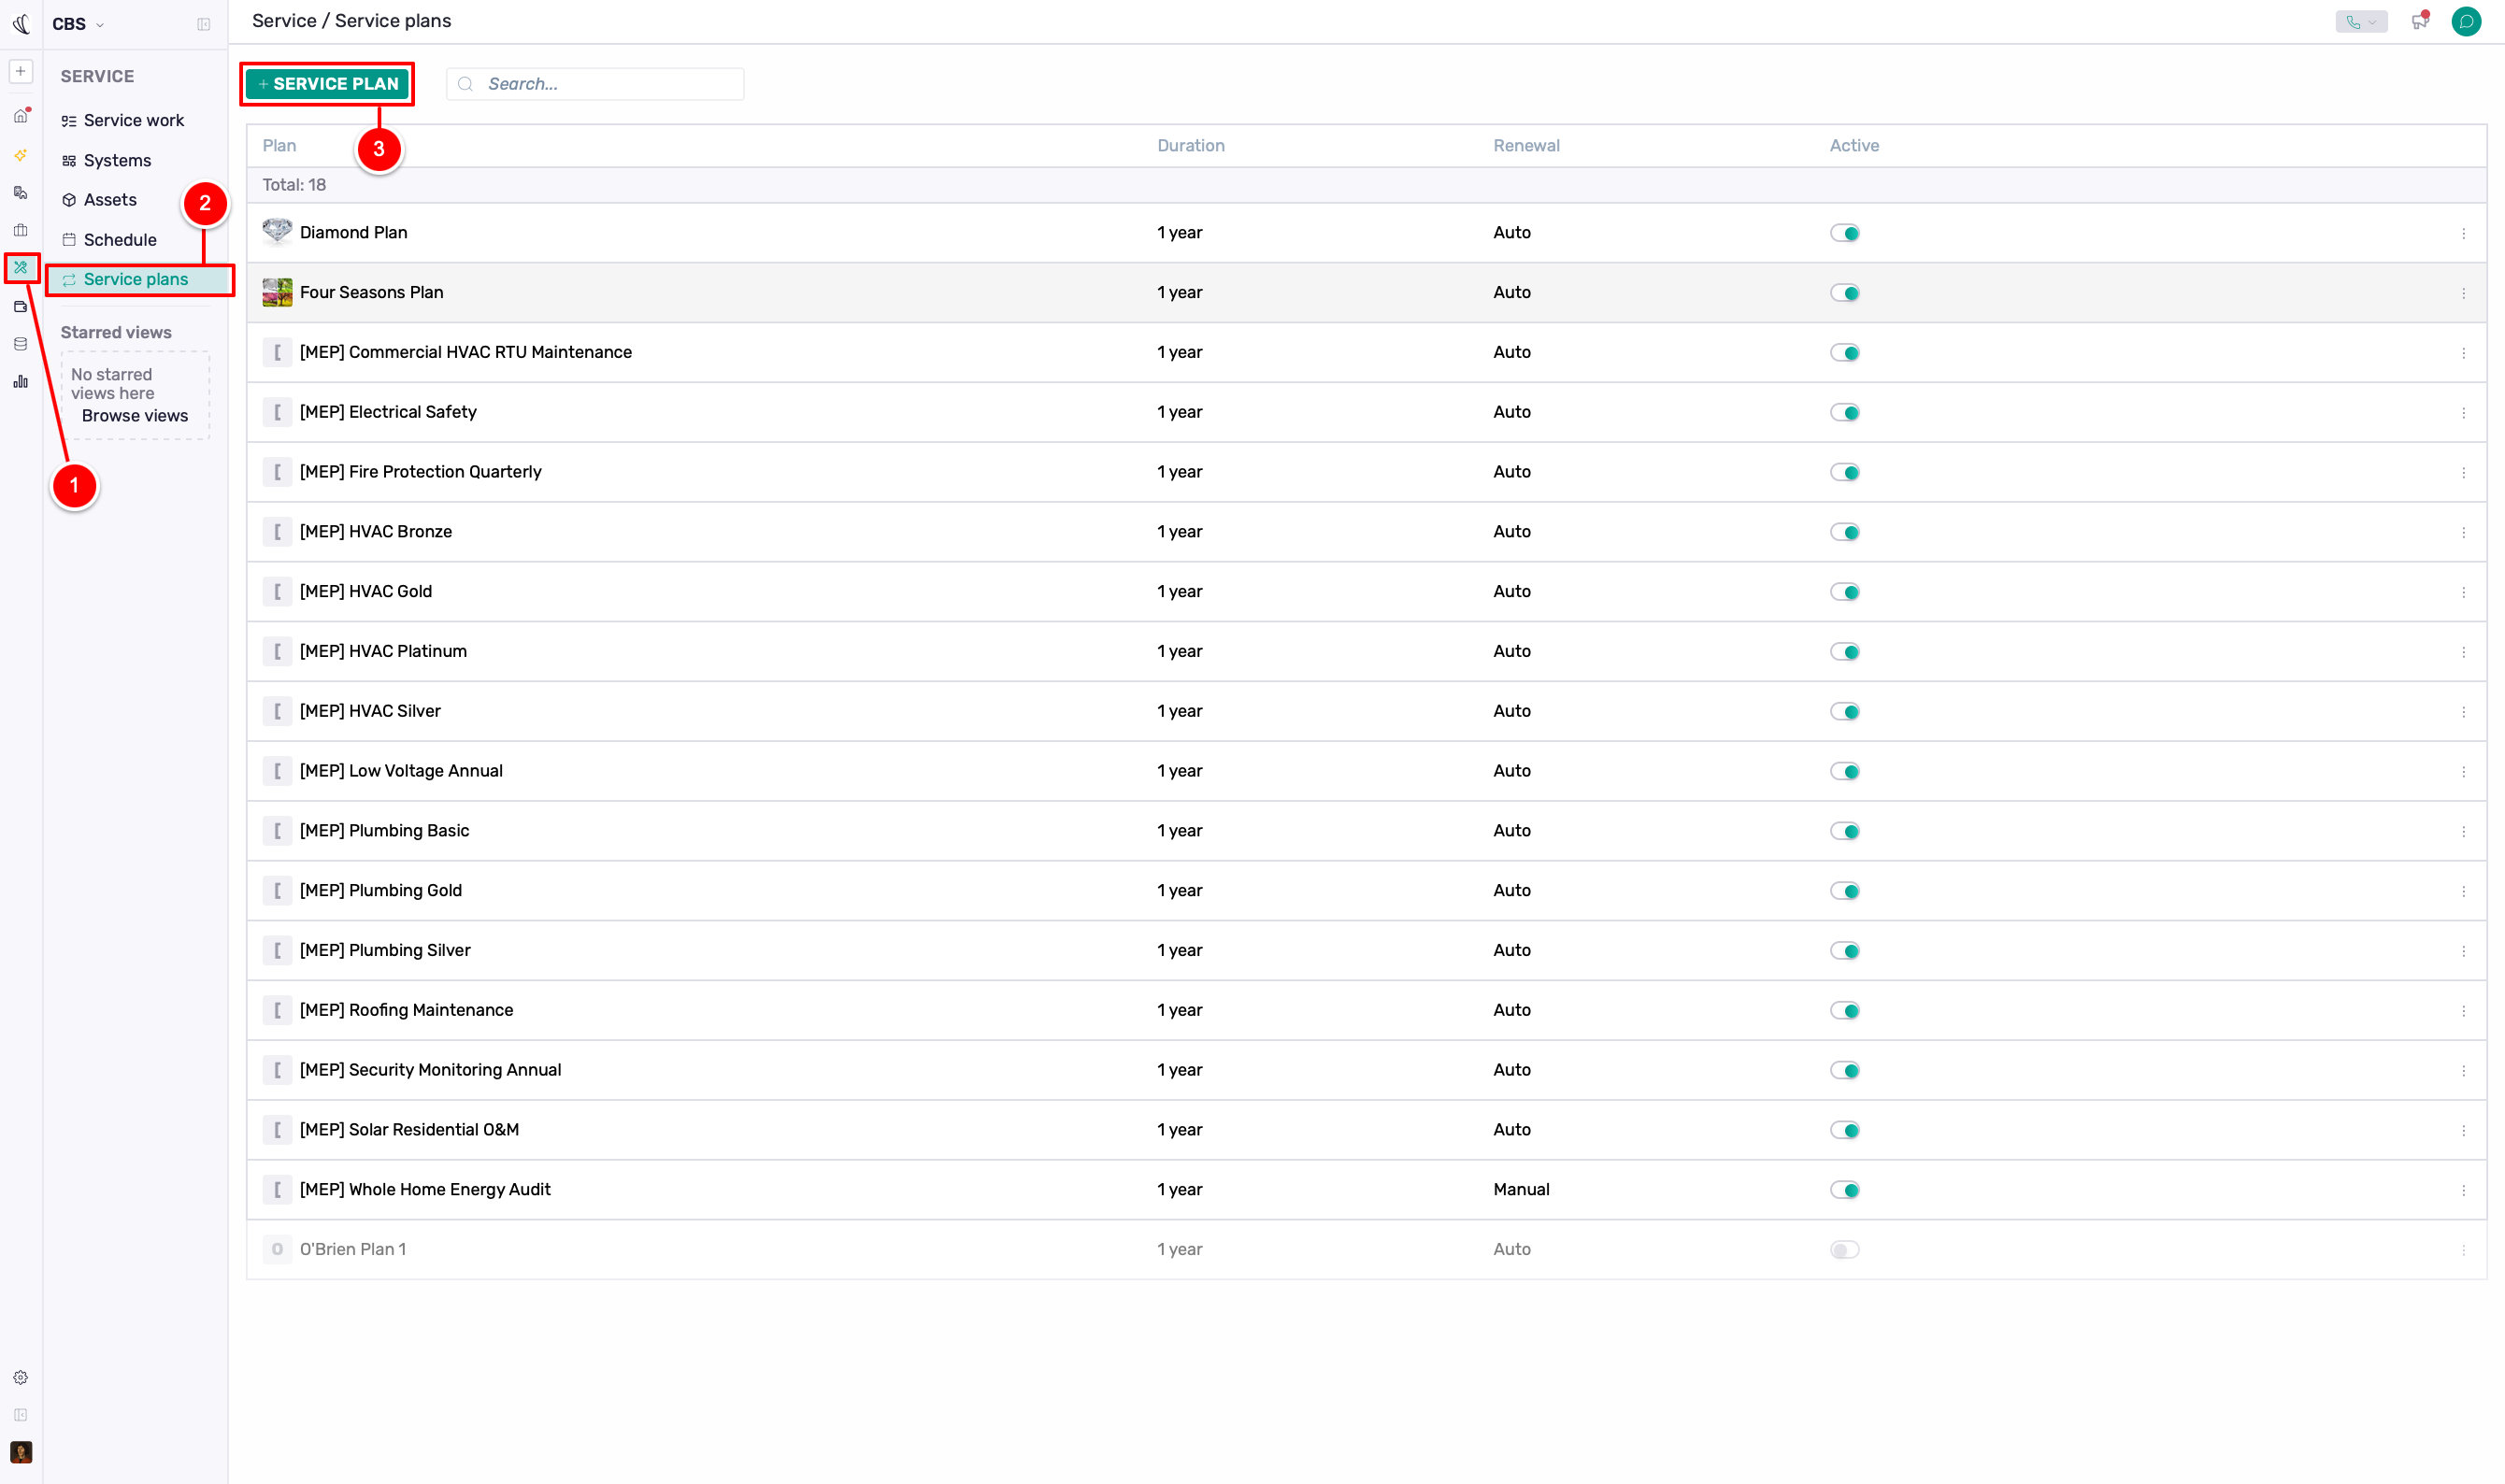
1. In the left navigation, open Service → Service plans, then click + Service Plan.
2. Navigate to Service Plans
3. Click + Service Plan
Step 2: Basic Information
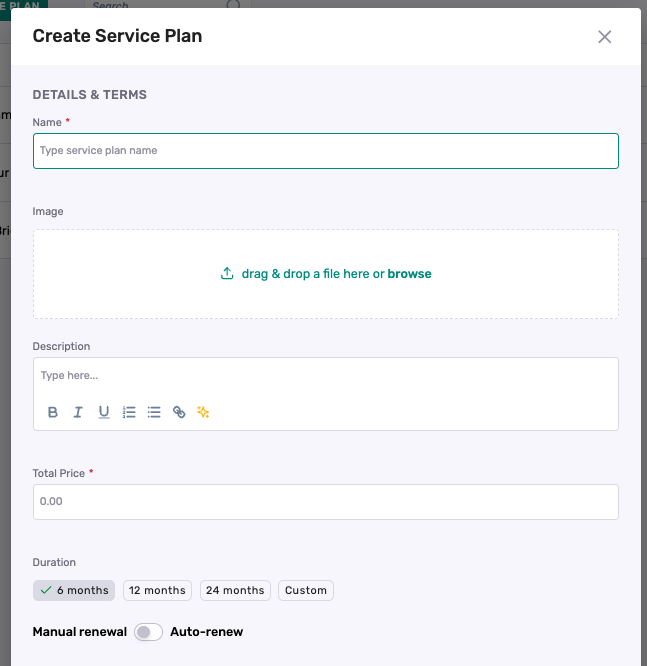
Fill in the basic details:
Name: Give your service plan a descriptive name (e.g., "Annual Maintenance Plan", "Monthly Inspection Service")
Description: Optional description of what the plan includes
Image: Optional image to help identify the plan visually
Total Price: The total price for the entire service plan duration
Duration: Select from 6 months, 12 months, 24 months, or enter a custom duration
Auto-renew: Toggle whether the plan should automatically renew when it expires
Step 3: Add Work Order Items
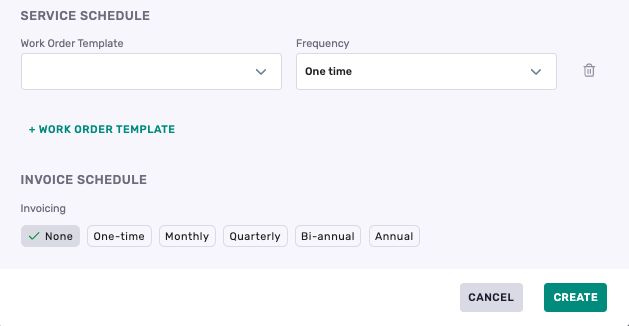
Add the recurring work orders that will be part of this plan:
Select a Work Order Template (must be a field work order template)
Choose the Frequency:
One-time: Performed once when the plan starts
Monthly: Every month
Quarterly: Every 3 months
Bi-Annual: Every 6 months
Annual: Once per year
Custom: Define a custom schedule (e.g., every 2 months, specific days of the month, etc.)
For custom frequencies, you can specify:
Interval: How often (e.g., every 2 months)
Anchor Type: By date (specific day of month) or by weekday (e.g., first Monday)
Day of Month: If using date anchor (1-31)
Week of Month: If using weekday anchor (1st, 2nd, 3rd, 4th week)
Day of Week: If using weekday anchor (Monday-Sunday)
Add a Recurrence Description (optional) to clarify the schedule (e.g., "First Monday of every month")
Repeat to add more work order items
Note: You must add at least one work order item to create a service plan.
Step 4: Configure Invoicing (Optional)
Set up how invoices are generated:
Invoicing Frequency:
None: No automatic invoicing
One-time: Single invoice when plan starts
Monthly: Invoice every month
Quarterly: Invoice every 3 months
Bi-annual: Invoice every 6 months
Annual: Invoice once per year
Invoice Terms (Days): Payment terms (e.g., Net 30, Net 15)
Note: If you set a total price and invoicing frequency, invoices will be automatically created based on the frequency. The total price will be divided across the invoicing periods.
Step 5: Create the Template
Click Create to create your service plan template. The template is now available to assign to accounts.
Assigning a Service Plan to a Account
Step 1: Navigate to Account Record
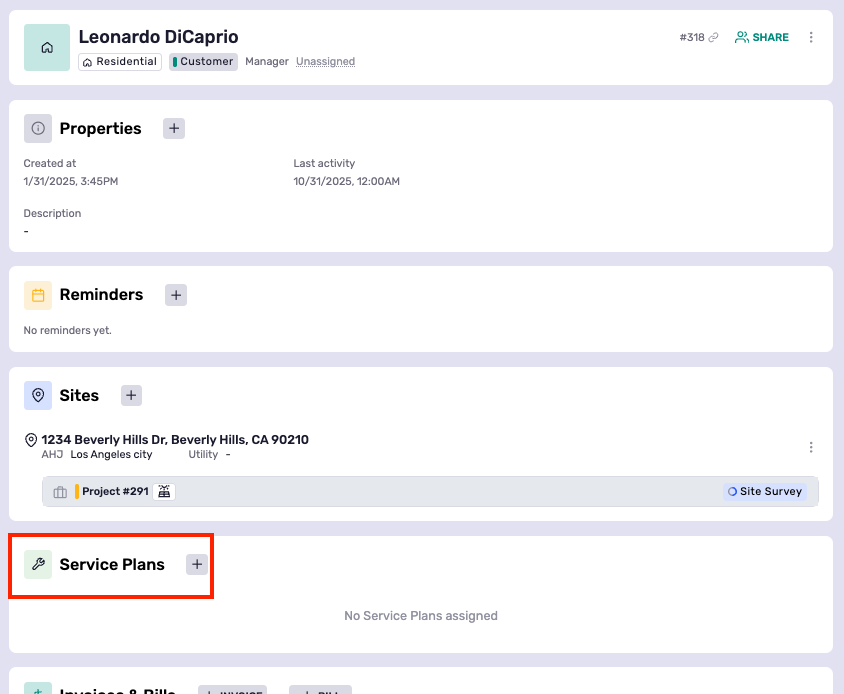
Open the Account record where you want to assign the service plan
Find the Service Plans section
Step 2: Assign Service Plan
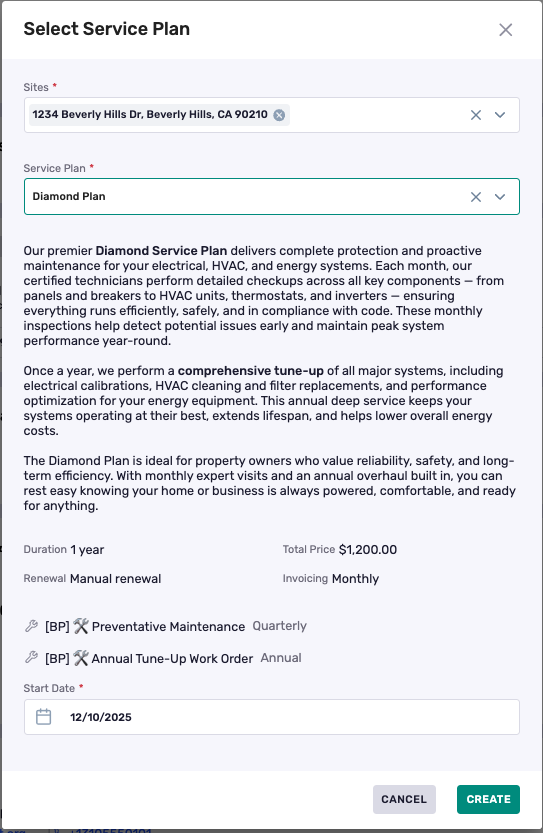
Click the + button in the Service Plans section
In the modal that opens:
Select Sites: Choose which site(s) this service plan applies to (at least one site is required)
Select Service Plan: Choose from your active service plan templates
Start Date: Select when the service plan should begin
Review the plan details shown:
Duration
Total Price
Renewal setting (Auto-renew or Manual renewal)
Invoicing frequency
List of work orders that will be created
Click Create to assign the plan
What Happens After You Assign a Service Plan?
When you assign a service plan to a account:
1. Service Plan Instance Created: A new instance is created with the selected start date and calculated end date
2. Work Orders Created: Work orders are automatically created for the next 30 days based on the plan's schedule
3. First Invoice Created: If invoicing is configured, the first invoice is created immediately
4. Recurring Jobs Scheduled: The system schedules recurring jobs to create future work orders and invoices
How Recurring Work Orders Work
The system automatically creates work orders based on your service plan schedule:
Automatic Creation
- Daily Job: A background job runs daily to create work orders for the next 30 days
- No Duplicates: The system prevents creating duplicate work orders for the same task on the same date
- Site-Specific: Work orders are created for each site assigned to the service plan instance
- Within Plan Duration: Work orders are only created within the service plan's active period
Work Order Details
Each work order created from a service plan:
- Is linked to the service plan instance
- Uses the work order template defined in the service plan item
- Is assigned to the correct site
- Has the appropriate due date based on the recurrence schedule
Example Scenarios
Monthly Inspection:
- Service plan item: "System Inspection" template, Monthly frequency
- Result: A "System Inspection" work order is created on the same day each month for each site
Quarterly Maintenance:
- Service plan item: "Quarterly Maintenance" template, Quarterly frequency
- Result: A "Quarterly Maintenance" work order is created every 3 months
Custom Schedule:
- Service plan item: "Filter Replacement" template, Custom frequency (first Monday of every month)
- Result: A "Filter Replacement" work order is created on the first Monday of each month
How Recurring Invoicing Works
If you've configured invoicing for your service plan:
Automatic Invoice Creation
- Based on Frequency: Invoices are created according to the invoicing frequency you set
- Price Distribution: The total price is divided across the invoicing periods
- Example: $1,200 annual plan with monthly invoicing = $100 per invoice
- Payment Terms: Each invoice includes the payment terms (Net 30, Net 15, etc.) you configured
Invoice Timing
- First Invoice: Created immediately when the service plan instance is created
- Subsequent Invoices: Created automatically based on the invoicing frequency
- Within Plan Duration: Invoices are only created while the plan is active
For example:
Monthly Invoicing:
- Total Price: $1,200
- Duration: 12 months
- Invoicing Frequency: Monthly
- Result: 12 invoices of $100 each, created monthly
Quarterly Invoicing:
- Total Price: $2,400
- Duration: 12 months
- Invoicing Frequency: Quarterly
- Result: 4 invoices of $600 each, created every 3 months
Auto-Renewal
How It Works
If a service plan has auto-renewal enabled:
- When the plan reaches its end date, it automatically renews for another period
- The renewal uses the same duration as the original plan
- A new service plan instance is created with a new start and end date
- Work orders and invoices continue to be generated for the renewed plan
Manual Renewal
If Auto-renew is disabled, the Service Plan expires at its end date and its status changes to Completed. No additional work orders or invoices are generated.
Managing Service Plans
Viewing Service Plans
Open the Account and locate its Service Plans section.
From there, you can view the Service Plans assigned to that Account, including:
Status: Active, Completed, or Cancelled
Start Date
End Date
Associated Sites
Updating a Service Plan
You can update an active service plan instance:
- Status: Change to Completed or Cancelled
- Auto-renew: Enable or disable auto-renewal
Note: Changes to the service plan template do not affect existing instances. Only new instances will use the updated template.
Cancelling a Service Plan
If a customer no longer needs the Service Plan:If a customer no longer needs the Service Plan:
1. Open the service plan instance
2. Change the status to Cancelled
3. Save the changes
Once cancelled, Coperniq stops generating new work orders and invoices for that plan.
Existing work orders and invoices are not deleted or affected by cancelling the plan.
Best Practices
A few simple practices can help keep your Service Plans organized and ensure recurring work and billing continue as expected.
Creating Service Plan Templates
1. Use Clear Names: Name your plans descriptively so they're easy to identify
2. Set Appropriate Durations: Match durations to your service contracts
3. Configure Pricing: Always set a total price if you want automatic invoicing
4. Test Recurrence Schedules: Verify custom frequencies work as expected
5. Use Descriptions: Add recurrence descriptions to clarify complex schedules
Managing Instances
1. Monitor Active Plans: Regularly review active service plan instances
2. Check Work Order Creation: Verify work orders are being created on schedule
3. Review Invoices: Ensure invoices are being generated correctly
4. Update as Needed: Adjust auto-renewal settings based on account preferences
Work Order Templates
1. Use Field Work Orders: Only field work order templates can be used in service plans
2. Include All Details: Make sure work order templates have all necessary information
3. Set Appropriate Durations: Work order templates should have realistic time estimates
Troubleshooting
Work Orders Not Being Created
Check that:
- Check Plan Status: Ensure the service plan instance is Active
- Verify Dates: Confirm the plan hasn't expired (check end date)
- Review Schedule: Check that the recurrence schedule is correct
- Check Sites: Ensure at least one site is assigned to the instance
- Wait for Daily Job: Work orders are created by a daily background job - allow up to 24 hours
Invoices Not Being Created
Confirm that:
- Check Invoicing Configuration: Verify invoicing frequency is set (not "None")
- Verify Total Price: Ensure a total price is set on the service plan
- Check Plan Status: Invoices are only created for Active plans
- Review Timing: First invoice is created immediately; subsequent invoices follow the frequency schedule
Duplicate Work Orders
- The system prevents duplicates automatically
- If you see duplicates, they may have been created manually
- Check the work order's service plan instance link to verify it was auto-created
Service Plan Isn't Renewing
If an expected renewal hasn't occurred:
Confirm Auto-renew is enabled.
Check whether the Service Plan has reached its end date.
Make sure the Service Plan is still Active.
Need Help?
If something isn't working as expected after reviewing your configuration, contact Coperniq Support and we'll be happy to help.